
Have you ever wanted to send the same email to several people ? However, you need to word each message slightly differently based on who the receipt was going to be.
- Perhaps the positions vary?
- Perhaps the greetings vary?
- Perhaps the salutations vary?
There is an easy tool, right on your desk, that can do just that. By using Excel sheets and Microsoft (MS ) Word, you can achieve this. This is possible with a feature MS Word has, which is called Mail Merge.
What is mail merge? 😕
Mail merge is a powerful feature that lets you create personalized letters or emails by combining a Word document with data from an Excel spreadsheet.
Here’s a simple, step-by-step guide which you can use
🧰 What You’ll Need
- Microsoft Word
- Microsoft Excel
- Microsoft Outlook classic
- A cup of tea 🍵(This one is really optional)
Step 1: Prepare Your Spreadsheet
- Open Excel. A spreadsheet is always available by default.
- In the first row, add the headers like so:
Name in cell A1
Email in cell B1
Greeting in cell C1
- Fill data under each column. This is what I am using.
| Name | Greeting | |
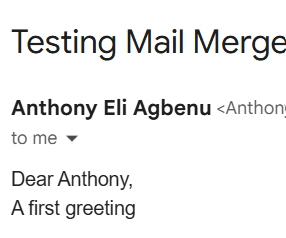
| Anthony | A first greeting | anthony.eli.agbenu@gmail.com |
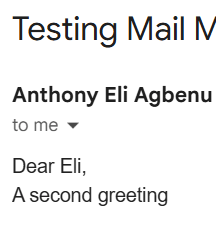
| Eli | A second greeting | eli.anthony.agbenu@gmail.com |
- Save the file as Test.xlsx.
Step 2: Create Your Word template
- Open Microsoft Word and start a new blank document.
- Write your message.
For example:
Dear ,
You will notice that our greeting is missing two things; the name and the greeting. We need to add these two elements into our Mail Merge.
🔗 Step 3: Start the Mail Merge in Word
- Go to the Mailings tab.
- Click Start Mail Merge > Email Messages.
- Click Select Recipients > Use an Existing List.
- Select your Excel file.
- Click Ok on the pop-up which shows up. It would ask you to choose the correct worksheet (usually this will be Sheet1$).
Step 4: Insert Merge Fields
- Place your cursor where you want to insert a field ( after “Dear”).
- Click Insert Merge Field and choose the field (e.g. Name).
- Again, click Insert Merge Field and do this for the field Message to include it in the document
Your word file might now look like the below:
Dear «Name»,
«Message»
The final step allows us to see it all live
👀 Step 5: Preview, Test and Ship
- Click Preview Results to see how your document looks with real data.
- Use the arrow keys to scroll through different recipients.
- Click Finish & Merge > Send Email Messages
- A pop-up would come up with the following fields
- To : Select the Email field
- Subject line: Type your preferred subject. Here we can use Testing Mail Merge
- Mail format: You have the options of HTML, Plain text and Attachment.
- HTML : Use this if you want the body of the email to have your greeting. This will be interpreted as HTML code
- Plain text: Same to the above only that it will be interpreted as plain text
- Attachment: Use this if you want to attach the word file as an attachment to the email
- We would want to send it as plain text, so select plain text and Click OK.
🎉 You’re Done!
At this point, Outlook would now send the email on your behalf.
Congratulations,👏🏽 we are done! Below are results when I tested against my own emails.
Now you can employ these same steps to print or email personalized documents for each person.
These simple steps would save you time. There is no need to email one after the other. You can simply do it at once.
I hope you found this post useful. If you want assistance with this, please feel free to reach out to me.
Have a great day.

Leave a comment